Auditorías de bases de datos.
En este post veremos como auditar bases de datos.
Creado en February 20, 2023.
Tabla de Contenido.
Activa desde SQL*Plus la auditoría de los intentos de acceso exitosos al sistema. Comprueba su funcionamiento.
Lo primero que haremos es comprobar que las auditorías están activadas en nuestra base de datos. Para ello ejecutaremos lO siguiente:
SHOW PARAMETER AUDIT;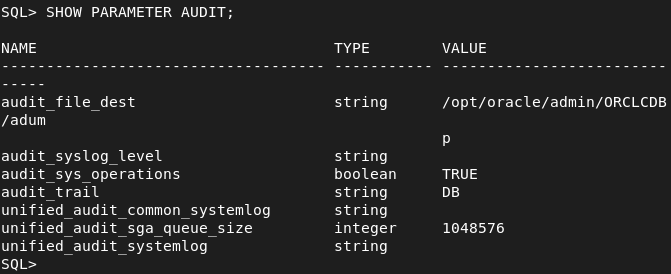
Como se aprecia, el valor de audit_trail es DB, si no estuvieran activadas, aparecería none. Si queremos activarlos tenemos que ejecutar la siguiente consulta y reiniciar el sistema:
ALTER SYSTEM SET audit_trail=db scope=spfile;Una vez hecho este paréntesis, procederemos a realizar el ejercicio. Para auditar los intentos exitosos de acceso, tenemos que ejecutar el siguiente comando:
SQL> AUDIT CREATE SESSION BY ACCESS;

Auditoria terminada correctamente.
Ahora realizamos intentos exitosos de login y ejecutamos lo siguiente para ver si se han registrados los intentos:
SQL> SELECT OS_USERNAME, USERNAME, EXTENDED_TIMESTAMP, ACTION_NAME FROM DBA_AUDIT_SESSION;

OS_USERNAME
--------------------------------------------------------------------------------
USERNAME
--------------------------------------------------------------------------------
EXTENDED_TIMESTAMP
---------------------------------------------------------------------------
ACTION_NAME
----------------------------
alemd
PRUEBA
20/02/23 09:28:09,091698 +01:00
LOGON

OS_USERNAME
--------------------------------------------------------------------------------
USERNAME
--------------------------------------------------------------------------------
EXTENDED_TIMESTAMP
---------------------------------------------------------------------------
ACTION_NAME
----------------------------
alemd
PRUEBA2
20/02/23 09:28:15,544590 +01:00
LOGON

OS_USERNAME
--------------------------------------------------------------------------------
USERNAME
--------------------------------------------------------------------------------
EXTENDED_TIMESTAMP
---------------------------------------------------------------------------
ACTION_NAME
----------------------------
alemd
ALEMD
20/02/23 09:28:19,944716 +01:00
LOGON
Como vemos indica que el usuario del sistema alemd se ha intentado conectar a los usuarios de la base de datos prueba, prueba2 y alemd, indica la fecha y hora del intento, y LOGON que indica que ha intentado conectar.
Si queremos volver a desactivar la auditoría ejecutamos el siguiente comando:
NOAUDIT CREATE SESSION WHENEVER NOT SUCCESSFUL;Realiza un procedimiento en PL/SQL que te muestre los accesos fallidos junto con el motivo de los mismos, transformando el código de error almacenado en un mensaje de texto comprensible. Contempla todos los motivos posibles para que un acceso sea fallido.
Adjunto los módulos de programación necesarios para la resolución del ejercicio:
CREATE OR REPLACE PROCEDURE P_EXPLICA (P_CODIGO DBA_AUDIT_SESSION.RETURNCODE%TYPE)
IS
BEGIN
    CASE P_CODIGO
    	WHEN 911 THEN
    		DBMS_OUTPUT.PUT_LINE('CONTIENE UN CARÁCTER INVÁLIDO.');
    	WHEN 1004 THEN
    		DBMS_OUTPUT.PUT_LINE('EL ACCESO HA SIDO DENEGADO.');
    	WHEN 1017 THEN
    		DBMS_OUTPUT.PUT_LINE('EL USUARIO/CONTRASEÑA NO ES VÁLIDO.');
    	WHEN 1045 THEN
    		DBMS_OUTPUT.PUT_LINE('EL USUARIO NO TIENE EL PERMISO CREATE SESSION.');
    	WHEN 28000 THEN
    		DBMS_OUTPUT.PUT_LINE('LA CUENTA ESTÁ BLOQUEADA.');
    	WHEN 28001 THEN
    		DBMS_OUTPUT.PUT_LINE('LA CONTRASEÑA HA CADUCADO.');
    	WHEN 28002 THEN
    		DBMS_OUTPUT.PUT_LINE('LA CONTRASEÑA VA A CADUCAR PRONTO, DEBERÍAS CAMBIARLA.');
    	WHEN 28003 THEN
    		DBMS_OUTPUT.PUT_LINE('LA CONTRASEÑA NO ES LO BASTANTE COMPLEJA.');
    	WHEN 28007 THEN
    		DBMS_OUTPUT.PUT_LINE('NO PUEDES REUTILIZAR LA CONTRASEÑA.');
    	WHEN 28008 THEN
    		DBMS_OUTPUT.PUT_LINE('CONTRASEÑA ANTIGUA INVÁLIDA.');
    	WHEN 28009 THEN
    		DBMS_OUTPUT.PUT_LINE('LA CONEXIÓN A SYS DEBE SER A TRAVÉS DE SYSDBA O SYSOPER.');
    	WHEN 28011 THEN
    		DBMS_OUTPUT.PUT_LINE('LA CONTRASEÑA VA A CADUCAR PRONTO, DEBERÍAS CAMBIARLA.');
    	WHEN 28009 THEN
    		DBMS_OUTPUT.PUT_LINE('LA CONTRASEÑA ORIGINAL NO SE HA INTRODUCIDO.');
    	ELSE
    		DBMS_OUTPUT.PUT_LINE('PÓNGASE EN CONTACTO CON EL ADMINISTRADOR PARA SABER LA RAZÓN.');
    END CASE;
END;
/

CREATE OR REPLACE PROCEDURE P_ACCESSFAILED
IS
    CURSOR C_INTENTOS_FALLIDOS IS
    SELECT OS_USERNAME, USERNAME, EXTENDED_TIMESTAMP, RETURNCODE
    FROM DBA_AUDIT_SESSION;
    V_REG C_INTENTOS_FALLIDOS%ROWTYPE;
BEGIN
    FOR V_REG IN C_INTENTOS_FALLIDOS LOOP
    	DBMS_OUTPUT.PUT_LINE('INTENTO FALLIDO DE ACCESO');
    	DBMS_OUTPUT.PUT_LINE('USUARIO DEL SISTEMA: '||V_REG.OS_USERNAME);
    	DBMS_OUTPUT.PUT_LINE('USUARIO DE LA BASE DE DATOS: '||V_REG.USERNAME);
    	DBMS_OUTPUT.PUT_LINE('FECHA Y HORA: '||V_REG.EXTENDED_TIMESTAMP);
    	P_EXPLICA(V_REG.RETURNCODE);
    	DBMS_OUTPUT.PUT_LINE(CHR(9));
    END LOOP;
END;
/
Ejecutamos el procedimiento:
SQL> EXEC P_ACCESSFAILED;
INTENTO FALLIDO DE ACCESO
USUARIO DEL SISTEMA: alemd
USUARIO DE LA BASE DE DATOS: PRUEBA
FECHA Y HORA: 20/02/23 09:28:09,091698 +01:00
EL USUARIO/CONTRASE??A NO ES V??LIDO.

INTENTO FALLIDO DE ACCESO
USUARIO DEL SISTEMA: alemd
USUARIO DE LA BASE DE DATOS: PRUEBA2
FECHA Y HORA: 20/02/23 09:28:15,544590 +01:00
EL USUARIO/CONTRASE??A NO ES V??LIDO.

INTENTO FALLIDO DE ACCESO
USUARIO DEL SISTEMA: alemd
USUARIO DE LA BASE DE DATOS: ALEMD
FECHA Y HORA: 20/02/23 09:28:19,944716 +01:00
EL USUARIO/CONTRASE??A NO ES V??LIDO.
Activa la auditoría de las operaciones DML realizadas por SCOTT. Comprueba su funcionamiento.
Para activar la auditoría en operaciones DML, ejecutamos el siguiente comando:
SQL> AUDIT INSERT TABLE, UPDATE TABLE, DELETE TABLE BY SCOTT;

Auditoria terminada correctamente.
Ahora nos conectamos con el usuario SCOTT y realizaremos algunos insert, update y deletes.
SQL> UPDATE DEPT SET LOC='SEVILLA' WHERE DEPTNO='30';

1 fila actualizada.

SQL> DELETE FROM EMP WHERE EMPNO='1234';

1 fila suprimida.

SQL> DELETE FROM EMP WHERE EMPNO='1298';

1 fila suprimida.

SQL> INSERT INTO DEPT VALUES (60,'PRUEBA','PRUEBA');

1 fila creada.
Ahora ejecutamos la siguiente consulta para ver si se han registrado los cambios:
SQL> SELECT USERNAME, OBJ_NAME, ACTION_NAME, EXTENDED_TIMESTAMP FROM DBA_AUDIT_OBJECT;

USERNAME
--------------------------------------------------------------------------------
OBJ_NAME
--------------------------------------------------------------------------------
ACTION_NAME
----------------------------
EXTENDED_TIMESTAMP
---------------------------------------------------------------------------
SCOTT
DEPT
INSERT
20/02/23 10:19:30,519384 +01:00


USERNAME
--------------------------------------------------------------------------------
OBJ_NAME
--------------------------------------------------------------------------------
ACTION_NAME
----------------------------
EXTENDED_TIMESTAMP
---------------------------------------------------------------------------
SCOTT
DEPT
UPDATE
20/02/23 10:16:50,299983 +01:00


USERNAME
--------------------------------------------------------------------------------
OBJ_NAME
--------------------------------------------------------------------------------
ACTION_NAME
----------------------------
EXTENDED_TIMESTAMP
---------------------------------------------------------------------------
SCOTT
EMP
DELETE
20/02/23 10:17:17,481421 +01:00


USERNAME
--------------------------------------------------------------------------------
OBJ_NAME
--------------------------------------------------------------------------------
ACTION_NAME
----------------------------
EXTENDED_TIMESTAMP
---------------------------------------------------------------------------
SCOTT
EMP
DELETE
20/02/23 10:17:30,738806 +01:00


USERNAME
--------------------------------------------------------------------------------
OBJ_NAME
--------------------------------------------------------------------------------
ACTION_NAME
----------------------------
EXTENDED_TIMESTAMP
---------------------------------------------------------------------------
SCOTT
EMP
DELETE
20/02/23 10:18:41,838448 +01:00


USERNAME
--------------------------------------------------------------------------------
OBJ_NAME
--------------------------------------------------------------------------------
ACTION_NAME
----------------------------
EXTENDED_TIMESTAMP
---------------------------------------------------------------------------
SCOTT
EMP
DELETE
20/02/23 10:18:55,888517 +01:00


6 filas seleccionadas.
Vemos como nos indica el usuario, la tabla a la que afecta, la acción realizada y la fecha.
Realiza una auditoría de grano fino para almacenar información sobre la inserción de empleados con sueldo superior a 2000 en la tabla emp de scott.
Lo primero que haremos será crear el procedimiento que controla la inserción de los empleados del departamento:
BEGIN
    DBMS_FGA.ADD_POLICY (
        object_schema      =>  'SCOTT',
        object_name        =>  'EMP',
        policy_name        =>  'policy_ej4',
        audit_condition    =>  'SAL > 2000',
        statement_types    =>  'INSERT'
    );
END;
/
Ahora insertaremos varios registros para comprobar si se registran en la auditoría:
SQL> INSERT INTO EMP VALUES (1234, 'SMITH', 'CLERK', 7902, TO_DATE('01-01-1999','MM-DD-YYYY'), 2500, NULL, 20);

1 fila creada.

SQL> INSERT INTO EMP VALUES (1235, 'SMITH', 'CLERK', 7902, TO_DATE('01-01-1999','MM-DD-YYYY'), 2001, NULL, 20);

1 fila creada.

SQL> INSERT INTO EMP VALUES (1236, 'SMITH', 'CLERK', 7902, TO_DATE('01-01-1999','MM-DD-YYYY'), 1999, NULL, 20);

1 fila creada.
He insertado una fila con el salario con 2500, otra con 2001 y otra fila con 1999, solo tienen que aparecer 2 registros en la auditoría. Ejecutaremos la siguiente consulta para ver si se han registrado:
SQL> SELECT DB_USER, OBJECT_NAME, SQL_TEXT, EXTENDED_TIMESTAMP FROM DBA_FGA_AUDIT_TRAIL WHERE POLICY_NAME='POLICY_EJ4';

DB_USER
--------------------------------------------------------------------------------
OBJECT_NAME
--------------------------------------------------------------------------------
SQL_TEXT
--------------------------------------------------------------------------------
EXTENDED_TIMESTAMP
---------------------------------------------------------------------------
SCOTT
EMP
INSERT INTO EMP VALUES (1234, 'SMITH', 'CLERK', 7902, TO_DATE('01-01-1999','MM-D
D-YYYY'), 2500, NULL, 20)
20/02/23 19:12:39,241404 +01:00

DB_USER
--------------------------------------------------------------------------------
OBJECT_NAME
--------------------------------------------------------------------------------
SQL_TEXT
--------------------------------------------------------------------------------
EXTENDED_TIMESTAMP
---------------------------------------------------------------------------

SCOTT
EMP
INSERT INTO EMP VALUES (1235, 'SMITH', 'CLERK', 7902, TO_DATE('01-01-1999','MM-D
D-YYYY'), 2001, NULL, 20)

DB_USER
--------------------------------------------------------------------------------
OBJECT_NAME
--------------------------------------------------------------------------------
SQL_TEXT
--------------------------------------------------------------------------------
EXTENDED_TIMESTAMP
---------------------------------------------------------------------------
20/02/23 19:12:45,600793 +01:00
Como vemos, solo se han registrado los insert que tienen el salario mayor a 2000.
Explica la diferencia entre auditar una operación by access o by session ilustrándolo con ejemplos.
La diferencia entre by access y by session, radica en cómo la vista DBA_AUDIT_TRAIL registra las acciones:
-
By access: Inserta un registro en la auditoría por cada declaración auditada.
-
By session: Agrupa los registro cuando la sesión y la acción coinciden. Solo funciona para declaraciones que no sean DDL.
Desde Oracle 11gR2 el by session está deshabilitado y todas las auditorías se hacen by access.
Veamos con un ejemplo la diferencia que puede resultar más sencillo de entender:
Sí ejecutamos la siguiente consulta, nos muestra todas las acciones que se han realizado desde que la tabla está siendo auditada.
SELECT  timestamp, os_username, obj_name,userhost, username,action,action_name, ses_actions
FROM    dba_audit_trail
WHERE   obj_name = 'EMP';
Sí esta tabla estuviese auditada by session agruparía los registros por sesión y acción, es decir, si tenemos 3 inserts para la tabla EMP en una misma sesión solo lo muestra una vez, sin embargo si estuviese auditada by access, mostraría los 3 inserts.
Documenta las diferencias entre los valores db y db, extended del parámetro audit_trail de ORACLE. Demuéstralas poniendo un ejemplo de la información sobre una operación concreta recopilada con cada uno de ellos.
Ambos valores indican que las auditorías están activadas en el sistema, y la diferencia se encuentra en que db, extended almacena datos que se corresponden con la tabla SQLBLIND y SQLTEXT en la tabla SYS.AUD$, mientras que db no almacena esa información.
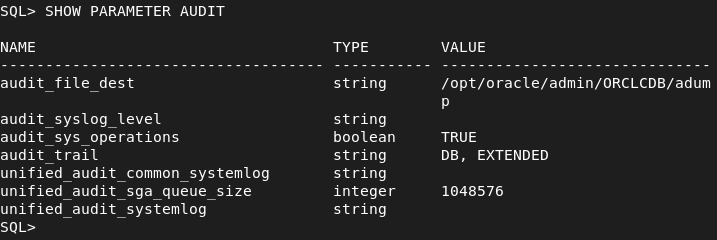
Para cambiar el valor de db a db, extended, ejecutamos la siguiente sentencia:
SQL> ALTER SYSTEM SET audit_trail = DB,EXTENDED SCOPE=SPFILE;

Sistema modificado.
Reiniciamos oracle para que se apliquen los cambios:
SQL> SHUTDOWN
Base de datos cerrada.
Base de datos desmontada.
Instancia ORACLE cerrada.
SQL> STARTUP
Instancia ORACLE iniciada.

Total System Global Area 3573545736 bytes
Fixed Size		    9141000 bytes
Variable Size		  738197504 bytes
Database Buffers	 2818572288 bytes
Redo Buffers		    7634944 bytes
Base de datos montada.
Base de datos abierta.
SQL>
Comprobamos que se han aplicado correctamente los cambios:
Ahora, desde el usuario SCOTT realizaremos dos deletes y dos inserts:
SQL> DELETE FROM EMP WHERE EMPNO = 111;

1 fila suprimida.

SQL> DELETE FROM EMP WHERE EMPNO = 112;

1 fila suprimida.

SQL> INSERT INTO EMP VALUES (111, 'SMITH', 'CLERK', 7902, TO_DATE('01-01-1999','MM-DD-YYYY'), 2500, NULL, 20);

1 fila creada.

SQL> INSERT INTO EMP VALUES (112, 'SMITH', 'CLERK', 7902, TO_DATE('01-01-1999','MM-DD-YYYY'), 2500, NULL, 20);

1 fila creada.
Ahora veremos que se ha guardado también en la vista SYS.AUD$:
SQL> SELECT SQLTEXT FROM SYS.AUD$ WHERE CURRENT_USER = 'SCOTT';

SQLTEXT
--------------------------------------------------------------------------------


SQLTEXT
--------------------------------------------------------------------------------


DELETE FROM EMP WHERE EMPNO = 111
DELETE FROM EMP WHERE EMPNO = 112
INSERT INTO EMP VALUES (111, 'SMITH', 'CLERK', 7902, TO_DATE('01-01-1999','MM-DD
INSERT INTO EMP VALUES (112, 'SMITH', 'CLERK', 7902, TO_DATE('01-01-1999','MM-DD

18 filas seleccionadas.

SQL>
Como vemos, indica que hay 18 filas pero solo muestra 4 registros de SQLTEXT, que son los que se han registrado desde que he indicado el valor DB, EXTENDED en el parámetro audit_trail.
Averigua si en Postgres se pueden realizar los cuatro primeros apartados. Si es así, documenta el proceso adecuadamente.
Averigua si en MySQL se pueden realizar los apartados 1, 3 y 4. Si es así, documenta el proceso adecuadamente.
Lo primero que tenemos que hacer es editar el fichero de configuración para activar los registros de accesos exitosos y fallidos:
root@mongodb:/home/usuario# nano /etc/mysql/mariadb.conf.d/50-server.cnf Descomentamos las 2 primeras líneas:
general_log_file       = /var/log/mysql/mysql.log
general_log            = 1
log_error = /var/log/mysql/error.log
Cambiamos el dueño del log de mysql a mysql y reiniciamos el servicio:
root@mongodb:/home/usuario# chown mysql: /var/log/mysql/
root@mongodb:/home/usuario# systemctl restart mysql
root@mongodb:/home/usuario# systemctl restart mariadb
Accedemos varias veces con usuarios inexistentes y existentes para que se guarde en el log y lo visualizamos:
root@mongodb:/home/usuario# cat /var/log/mysql/error.logEn este log nos muestra el acceso denegado, muestro la última línea:
2023-02-22 11:13:59 39 [Warning] Access denied for user 'prueba'@'localhost' (using password: NO)Este log nos muestra la conexión y los comandos usados durante esa sesión:
root@mongodb:/home/usuario# cat /var/log/mysql/mysql.logEl contenido de la última conexión es el siguiente:
230222 11:16:13	    40 Connect	alemd@localhost as anonymous on
		    40 Query	select @@version_comment limit 1
230222 11:16:16	    40 Query	show users
230222 11:16:21	    40 Query	show databases
230222 11:16:25	    40 Query	select * from dual
230222 11:16:30	    40 Quit
Más allá de este log, con mysql no se puede hacer mucho más de auditorías, a no ser, que instalemos un plugin de auditoría:
root@mongodb:/home/usuario# mysql
Welcome to the MariaDB monitor.  Commands end with ; or \g.
Your MariaDB connection id is 41
Server version: 10.3.36-MariaDB-0+deb10u2-log Debian 10

Copyright (c) 2000, 2018, Oracle, MariaDB Corporation Ab and others.

Type 'help;' or '\h' for help. Type '\c' to clear the current input statement.

MariaDB [(none)]> INSTALL SONAME 'server_audit';
Query OK, 0 rows affected (0,045 sec)
Una vez tengamos instalado el plugin, necesitamos activarlo editando el fichero de configuración de mysql.
root@mongodb:/home/usuario# nano /etc/mysql/mariadb.conf.d/50-server.cnfEn el apartado server, añadimos lo siguiente:
server_audit_events=CONNECT,QUERY,TABLE
server_audit_logging=ON
server_audit_incl_users=alemd
Reiniciamos el servicio y probaremos a crear una pequeña tabla en la base de datos alemd e insertaremos registros en esa tabla.
CREATE TABLE ALUMNO (
	NOMBRE VARCHAR(30),
	APELLIDO1 VARCHAR(30),
	APELLIDO2 VARCHAR(30)
)

INSERT INTO ALUMNO VALUES ('JUAN','PEREZ','LOPEZ');
INSERT INTO ALUMNO VALUES ('JUAN','PEREZ','LOPEZ');
INSERT INTO ALUMNO VALUES ('JUAN','PEREZ','LOPEZ');
Si visualizamos el siguiente log, vemos que nos indica los inserts realizados:
root@mongodb:/home/usuario# cat /var/lib/mysql/server_audit.log El contenido es el siguiente:
20230222 11:43:36,mongodb,alemd,localhost,37,64,QUERY,prueba,'INSERT INTO ALUMNO VALUES (\'JUAN\',\'PEREZ\',\'LOPEZ\')',0
20230222 11:43:37,mongodb,alemd,localhost,37,65,WRITE,prueba,ALUMNO,
20230222 11:43:37,mongodb,alemd,localhost,37,65,QUERY,prueba,'INSERT INTO ALUMNO VALUES (\'JUAN\',\'PEREZ\',\'LOPEZ\')',0
20230222 11:43:38,mongodb,alemd,localhost,37,66,WRITE,prueba,ALUMNO,
20230222 11:43:38,mongodb,alemd,localhost,37,66,QUERY,prueba,'INSERT INTO ALUMNO VALUES (\'JUAN\',\'PEREZ\',\'LOPEZ\')',0
20230222 11:43:53,mongodb,alemd,localhost,37,0,DISCONNECT,prueba,,0
Nos muestra la hora, el nombre de la máquina(mongodb), el usuario de la base de datos, la conexión que es localhost, sobre que tabla se realiza y que es lo que hace. Como es una tabla sencilla sin primary key, yo he usado varias veces el mismo registro.
Averigua las posibilidades que ofrece MongoDB para auditar los cambios que va sufriendo un documento. Demuestra su funcionamiento.
La única versión de MongoDB que nos permite realizar auditorías es MongoDB Enterprise. Tendremos 3 opciones para realizar auditorías:
- Que se guarden en el
syslog - Que se guarden en un fichero JSON o BSON.
- O hacer que aparezcan en la consola.
Lo primero que haremos, será ver las distintas maneras de habilitar las auditorías:
-
Desde la consola, habilitar la auditoría en el syslog.
mongod --dbpath /var/lib/mongodb/ --auditDestination syslog -
Desde la consola, habilitar la auditoría en un fichero JSON o BSON.
mongod --dbpath /var/lib/mongodb/ --auditDestination file --auditFormat [JSON|BSON] --auditPath /var/lib/mongodb/[auditLog.json|auditLog.bson] -
Desde la consola, habilitar la auditoría en la consola.
mongod --dbpath /var/lib/mongodb/ --auditDestination console -
Desde el fichero de configuración de mongodb, habilitar las auditorías en el syslog.
nano /etc/mongod.conf

storage:
  dbPath: /var/lib/mongodb/
auditLog:
destination: syslog -
Desde el fichero de configuración de mongodb, habilitar las auditorías en un fichero JSON o BSON.
nano /etc/mongod.conf

storage:
  dbPath: /var/lib/mongodb/
auditLog:
  destination: file
  format: [JSON|BSON]
path: /var/lib/mongodb/[auditLog.json|auditLog.bson] -
Desde el fichero de configuración de mongodb, habilitar las auditorías en la consola.
storage:
  dbPath: /var/lib/mongodb/
auditLog:
  destination: console
La opción que yo he elegido, ha sido desde la terminal, habilitar las auditorías usando un fichero JSON:
root@mongodb:/home/vagrant# mongod --dbpath /var/lib/mongodb/ --auditDestination file --auditFormat JSON --auditPath /var/lib/mongodb/auditLog.jsonSi hacemos un cat al fichero nos muestra que funciona correctamente:
root@mongodb:/home/vagrant# cat /var/lib/mongodb/auditLog.json | jq
{
  "atype": "startup",
  "ts": {
    "$date": "2023-02-22T13:19:29.635+00:00"
  },
  "uuid": {
    "$binary": "TV6jVkoZSsW96vJFM/dq9g==",
    "$type": "04"
  },
  "local": {
    "isSystemUser": true
  },
  "remote": {
    "isSystemUser": true
  },
  "users": [],
  "roles": [],
  "param": {
    "options": {
      "auditLog": {
        "destination": "file",
        "format": "JSON",
        "path": "/var/lib/mongodb/auditLog.json"
      },
      "storage": {
        "dbPath": "/var/lib/mongodb/"
      }
    }
  },
  "result": 0
}
{
  "atype": "createDatabase",
  "ts": {
    "$date": "2023-02-22T13:19:32.583+00:00"
  },
  "uuid": {
    "$binary": "TV6jVkoZSsW96vJFM/dq9g==",
    "$type": "04"
  },
  "local": {
    "isSystemUser": true
  },
  "remote": {
    "isSystemUser": true
  },
  "users": [],
  "roles": [],
  "param": {
    "ns": "admin"
  },
  "result": 0
}
Realizo algunas operaciones y las muestro:
Aquí nos muestra que hemos creado una base de datos.
{
  "atype": "createDatabase",
  "ts": {
    "$date": "2023-02-22T13:19:33.696+00:00"
  },
  "uuid": {
    "$binary": "DWSnKPyfQqqYzkg/S+VBbg==",
    "$type": "04"
  },
  "local": {
    "isSystemUser": true
  },
  "remote": {
    "isSystemUser": true
  },
  "users": [],
  "roles": [],
  "param": {
    "ns": "config"
  },
  "result": 0
}
Aquí nos muestra que hemos creado una colección.
{
  "atype": "createCollection",
  "ts": {
    "$date": "2023-02-22T13:19:33.696+00:00"
  },
  "uuid": {
    "$binary": "DWSnKPyfQqqYzkg/S+VBbg==",
    "$type": "04"
  },
  "local": {
    "isSystemUser": true
  },
  "remote": {
    "isSystemUser": true
  },
  "users": [],
  "roles": [],
  "param": {
    "ns": "config.system.sessions"
  },
  "result": 0
}
Aquí nos muestra que nos deslogueamos
{
  "atype": "logout",
  "ts": {
    "$date": "2023-02-22T13:21:23.017+00:00"
  },
  "uuid": {
    "$binary": "mmU3D1a+R1K9BAYKB6HfzQ==",
    "$type": "04"
  },
  "local": {
    "isSystemUser": true
  },
  "remote": {
    "isSystemUser": true
  },
  "users": [],
  "roles": [],
  "param": {
    "reason": "Client has disconnected",
    "initialUsers": [
      {
        "user": "__system",
        "db": "local"
      }
    ],
    "updatedUsers": []
  },
  "result": 0
}
Averigua si en MongoDB se pueden auditar los accesos a una colección concreta. Demuestra su funcionamiento.
Sí, se pueden auditar los accesos a una colección concreta. Seguiremos los siguientes pasos:
-
Conectados al usuario admin. crearemos una base de datos donde se guardará la colección y creamos la colección que vamos a auditar:
Enterprise test> use prueba
switched to db prueba
Enterprise prueba> db.createCollection("alumno")
{ ok: 1 } -
Insertamos datos en la colección:
Enterprise prueba> db.alumno.insertMany( [
...   { nombre: "Ale", id: 1 },
...   { nombre: "Manolo", id: 2 },
...   { nombre: "Paco", id: 3 }
... ] )
{
  acknowledged: true,
  insertedIds: {
    '0': ObjectId("63f6298e92eef3c4cdabb572"),
    '1': ObjectId("63f6298e92eef3c4cdabb573"),
    '2': ObjectId("63f6298e92eef3c4cdabb574")
  }
} -
Le damos al usuario admin permisos de root y ejecutamos el comando con el que se va a activar la auditoría:
Enterprise admin> db.grantRolesToUser('admin', [{ role: 'root', db: 'admin' }])
{ ok: 1 }
Enterprise admin> db.setLogLevel(3, "accessControl")
{
  was: {
    verbosity: 0,
    accessControl: { verbosity: -1 },
    assert: { verbosity: -1 },
    command: { verbosity: -1 },
    control: { verbosity: -1 },
    executor: { verbosity: -1 },
    geo: { verbosity: -1 },
    index: { verbosity: -1 },
    network: {
      verbosity: -1,
      asio: { verbosity: -1 },
      bridge: { verbosity: -1 },
      connectionPool: { verbosity: -1 }
    },
    processHealth: { verbosity: -1 },
    query: { verbosity: -1 },
    replication: {
      verbosity: -1,
      election: { verbosity: -1 },
      heartbeats: { verbosity: -1 },
      initialSync: { verbosity: -1 },
      rollback: { verbosity: -1 }
    },
    sharding: {
      verbosity: -1,
      rangeDeleter: { verbosity: -1 },
      shardingCatalogRefresh: { verbosity: -1 },
      migration: { verbosity: -1 },
      reshard: { verbosity: -1 },
      migrationPerf: { verbosity: -1 }
    },
    storage: {
      verbosity: -1,
      recovery: { verbosity: -1 },
      journal: { verbosity: -1 },
      wt: {
        verbosity: -1,
        wtBackup: { verbosity: -1 },
        wtCheckpoint: { verbosity: -1 },
        wtCompact: { verbosity: -1 },
        wtEviction: { verbosity: -1 },
        wtHS: { verbosity: -1 },
        wtRecovery: { verbosity: -1 },
        wtRTS: { verbosity: -1 },
        wtSalvage: { verbosity: -1 },
        wtTiered: { verbosity: -1 },
        wtTimestamp: { verbosity: -1 },
        wtTransaction: { verbosity: -1 },
        wtVerify: { verbosity: -1 },
        wtWriteLog: { verbosity: -1 }
      }
    },
    write: { verbosity: -1 },
    ftdc: { verbosity: -1 },
    tracking: { verbosity: -1 },
    transaction: { verbosity: -1 },
    tenantMigration: { verbosity: -1 },
    test: { verbosity: -1 }
  },
  ok: 1
} -
Creamos un usuario que pueda acceder a la base de datos:
Enterprise prueba> db.createUser({
... user: "alemd",
... pwd: "usuario",
... roles: [{ role: "readWrite", db: "prueba"}]
... });
{ ok: 1 } -
Nos logueamos con el usuario y realizamos una consulta a la colección:
root@mongodb:/home/vagrant# mongosh -u alemd -p --authenticationDatabase prueba
Enter password: *******
Current Mongosh Log ID:	63f62d37e3bae1519b4d1fac
Connecting to:		mongodb://<credentials>@127.0.0.1:27017/?directConnection=true&serverSelectionTimeoutMS=2000&authSource=prueba&appName=mongosh+1.7.1
Using MongoDB:		6.0.4
Using Mongosh:		1.7.1

For mongosh info see: https://docs.mongodb.com/mongodb-shell/

Enterprise test> use prueba
switched to db prueba
Enterprise prueba> db.alumno.find()
[
  { _id: ObjectId("63f6298e92eef3c4cdabb572"), nombre: 'Ale', id: 1 },
  {
    _id: ObjectId("63f6298e92eef3c4cdabb573"),
    nombre: 'Manolo',
    id: 2
  },
  { _id: ObjectId("63f6298e92eef3c4cdabb574"), nombre: 'Paco', id: 3 }
] -
Creamos un usuario sin permisos y volvemos a realizar una consulta a la colección:
Enterprise admin> db.createRole({
...    role: "ninguno",
...    privileges: [
...       { resource: { db: "prueba", collection: "" }, actions: ["remove"] }
...    ],
...    roles: []
... })
{ ok: 1 }
Enterprise admin> db.createUser(
...   {
...     user: "usuario1",
...     pwd: "usuario",
...     roles: ["ninguno"]
...   }
... )
{ ok: 1 }
Enterprise admin> exit
root@mongodb:/home/vagrant# mongosh -u usuario1 -p --authenticationDatabase
Enter password: *******
Current Mongosh Log ID:	63f62e9e3d9f637adb8fedd1
Connecting to:		mongodb://<credentials>@127.0.0.1:27017/?directConnection=true&serverSelectionTimeoutMS=2000&appName=mongosh+1.7.1
Using MongoDB:		6.0.4
Using Mongosh:		1.7.1

For mongosh info see: https://docs.mongodb.com/mongodb-shell/

Enterprise test> use prueba
switched to db prueba
Enterprise prueba> db.alumno.find()
MongoServerError: not authorized on prueba to execute command { find: "alumno", filter: {}, lsid: { id: UUID("2c12c016-9e3f-4d64-9f09-d5830df633cd") }, $db: "prueba" } -
Consultamos el log y veremos los accesos de la colección:
Aquí nos muestra una autenticación fallada para el usuario alemd en la base de datos admin.
{
  "t": {
    "$date": "2023-02-22T14:56:40.449+00:00"
  },
  "s": "I",
  "c": "ACCESS",
  "id": 20249,
  "ctx": "conn74",
  "msg": "Authentication failed",
  "attr": {
    "mechanism": "SCRAM-SHA-256",
    "speculative": true,
    "principalName": "alemd",
    "authenticationDatabase": "admin",
    "remote": "127.0.0.1:36046",
    "extraInfo": {},
    "error": "UserNotFound: Could not find user \"alemd\" for db \"admin\""
  }
}
Aquí nos muestra un loggeo exitoso:
{
  "t": {
    "$date": "2023-02-22T15:02:58.635+00:00"
  },
  "s": "I",
  "c": "ACCESS",
  "id": 20250,
  "ctx": "conn101",
  "msg": "Authentication succeeded",
  "attr": {
    "mechanism": "SCRAM-SHA-256",
    "speculative": true,
    "principalName": "usuario1",
    "authenticationDatabase": "admin",
    "remote": "127.0.0.1:33724",
    "extraInfo": {}
  }
}
Aquí nos muestra el intento fallido de acceso a una colección:
{
  "t": {
    "$date": "2023-02-22T15:02:45.500+00:00"
  },
  "s": "D1",
  "c": "ACCESS",
  "id": 20238,
  "ctx": "AuthorizationManager-9",
  "msg": "Getting user record",
  "attr": {
    "user": {
      "user": "usuario1",
      "db": "prueba"
    }
  }
}
{
  "t": {
    "$date": "2023-02-22T15:02:45.500+00:00"
  },
  "s": "I",
  "c": "ACCESS",
  "id": 20249,
  "ctx": "conn95",
  "msg": "Authentication failed",
  "attr": {
    "mechanism": "SCRAM-SHA-1",
    "speculative": false,
    "principalName": "usuario1",
    "authenticationDatabase": "prueba",
    "remote": "127.0.0.1:54242",
    "extraInfo": {},
    "error": "UserNotFound: Could not find user \"usuario1\" for db \"prueba\""
  }
}
Documento realizado por:
✒️ Alejandro Montes Delgado - 2º ASIR
Siguiente post
Post anterior.